Friday, September 24, 2010

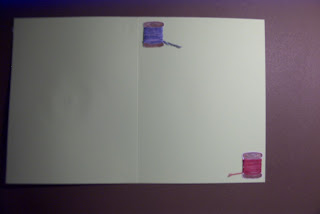
"SEW" Special card

I made this card for one of my Mom's Sewing friends.
The center stamp is from Justrite stamps, I colored it in using chalks and a blender pen. The other buttons are from another stamp set and I colored those using Stampin Up reinkers and a blender pen.(I LOVE coloring with reinkers and the blender pen!!) On the inside of the card is a stamp I had and I colored with the reinkers and wrapped thread around the spools. I haven't decided on a sentiment yet......  The card base is SU cs Gable Green.
Clic on Pic to enlarge


Wednesday, September 22, 2010

Just Because card

I made this card for a friend of mine. He likes "Long John Silver's" seafood. So when I find a coupon I send it to him in a card. This is the card I made. The plate and utensils are from the cart: From the Kitchen -plate is White cs(outlined using SU marker Bordering Blue) and utensils are silver metalic cs. ALL the lettering is from the cart: Lyrical Letters and SU cs Not Quite Navy. The placemat is a rectangle from the George cart and SU cs Sage Shadow and embossed using Argyle. The fish is from the cart: Create a Critter and embossed using Tiny Mosaics and SU cs Sage Shadow. The card itself is SU cs Bordering Blue.


inside of card: before and after coupon


Saturday, September 11, 2010

Grandparents Day card

Click on pics to enlarge
I made this card for my Mom from her grandkids and great grandkids.
On the gypsy I arranged the stars on the front and the sentiment was done on the computer. I used crystal stickles to outline the cut out of the stars. On the inside I recut the stars with white cs and using Justrite 6pt stamps I named each star and so they would shine I put Crystal accents over the stars (the names blurred a little) and sprinkled them with MS fine glitter. The sentiment on the inside was done on the computer.


Wednesday, August 25, 2010

Cakebox

CLIC ON PIC TO ENLARGE
I made these cakeboxes from TBBM for my nieces Bridal Shower.
I shrunk the boxes down on my gypsy to 6.43 X 5.16 (cut 4 out of 12x12)
I embossed using D'Vine Swirls.


On just the embossing I added Crystal Effects and Sprinkled MS Crystal Fine glitter


Using SU cardstock Sage Shadow I cut 2 strips 3/8"w x 4-1/2"L ran them thru the crimper. The first strip I formed my loops and the second strip is the tails folded in half and slighly spread apart. I then cut a tiny piece 3/4"Lx3/8"w and wrapped it around the center of my loops then attached the tails to the back.


With Brown cardstock I cut a strip 1"w x 8-1/2"L and folded in half and embossed using Distressed Stripes. I ran red tacky tape along the top and bottom and placed the tip of the cakebox in the brown fold. Make sure the brown runs along the bottom edge of the box, it won't come to the top and thats fine cause the "icing" drippy goo punch will cover the chocolate edge. Cut off excess.
For the icing I cut a strip 6-1/4 X 1" and used the MS drippy goo punch, I then trimmed the strip down to 9/16"w added red tacky tape and attached it to the top along the sides of the box. Trim excess.  
On the back I cut a piece of white cardstock 1-1/2"w x 1"h and edged it in Sage Shadow and using my 6pt Justrite stamps, I stamped the sentiment. (hint...the box will be filled with hugs and kisses chocolates)

I have the opening of the box upwards so when they open it the chocolate doesn't fall out and I made a little "pull" tab so they'll know how to open it.
 
I made 20+ boxes and formed 2 circles using 10 boxes a circle and then made a rose to put in the centers.


Tuesday, August 17, 2010

Better organization

CLIC ON PIC TO ENLARGE...
Remember this! I made it, Neat HUH?? Yeah ,yeah what about it? keep scrolling down.....


and Remember these matchboxes for the ribbon? I made these too...


ENOUGH BRAGGING! what about it??? Guess what they have in common????........
BETTER ORGANIZATION!!! Oh, add 47 MORE matchboxes and this is WHAT YOU GET!!!!!!LOOK!.....>>>>

I PUT THE MATCHBOXES IN THE CORNERS OF THE MARKER HOLDER. The marker holder is shaped like a triangle that gave me 3 corners for matchboxes and I can get 20 matchboxes each corner!!


this has my SU 5/8" ribbon(notice the ribbon coming out the side) plus a few extra boxes

this side will be for my SU 1/8" ribbon(when I get it) plus a few extra boxes

this side has my 48 SU ink daubers(3per box)plus a few extra boxes

heres some close up pics


this is what it looks like in the center...the stand is on a lazy susan..hummm I think my SU reinkers will fit down in there......


VERY NEAT HUH??? THATS WHAT I CALL VERY CREATIVE THINKING!!!! What am I going to do with those extra boxes? I'm thinking embellishments or I just discovered the SU ink spots will fit.
the directions for the marker holder were posted earlier and for the matchboxes, I'm sorry! I'm not sharing the file at this time. The SU matchbox is the same size I'm using. Snowmanlover is my SU rep if you'd like to order one.

Tuesday, August 3, 2010

stamp storage

clic on pic to enlarge
I changed ALL my stamps over to DVD cases (from Stampin Up). Thats 40 CD cases changed into 18 DVD cases. WWAAAHHOOO!!!! This so so much BETTER, now my stamps are together instead of several CD cases.  I have them in a photobox (from Michaels) I'll store them upright (not sides ways) on a shelf easy access.


I stamped the front cover

the back cover

the inside

the label was done on the computer

Friday, July 30, 2010

mini Hershey purse

I shrunk down the purse from TBBM to : w 6.08 x h 3.74 (gypsy) turned the top of the purse to a corner on the mat and you can cut four out of a 12x12. I used 4 different embossing folders and used ribbon for the handles. I made 10 of each color. I'm taking them into work Aug 1st "FRIENDSHIP DAY".  A minature hersheys (varity pack) will fit. I put repositionable adhesive on the flap to keep them closed. CUTE HUH? Oh, PURS onally I know you prefer chocolate!!!! ROTFLOL!!
WARNING! cut out purse,score, fold scores and then emboss!! LOL it's very hard to see the tic marks after embossing.